Lesson 2: Major and Minor Chords
Lesson Objective: By the end of this lesson, you will be able to differentiate between major and minor chords, understand their distinct characteristics, and confidently identify them in musical contexts.
Explore Major Chords:
- Happy Chords (Major): Reflect cheerful and positive emotions. Think of a time when they felt really happy.
Explore Minor Chords:
- Sad Chords (Minor): Relate minor chords to feelings of sadness or something a bit more serious. Think of a time when they felt a bit down.
Activity 1:
Listen to a series of chords on the piano. Listen and try to identify whether the chord played is major or minor.
Group Discussion:
Come together to discuss: What did you notice about major and minor chords? Are there any patterns or characteristics that stood out?
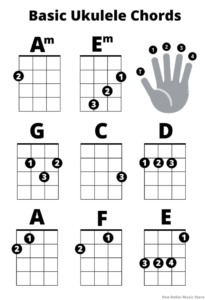
Activity 2: By using Ukulele major and minor chords create a major and minor song. Play it all together and upload on Flips.
You can use this lyrics to help you to structure your composition:
(Verse 1)
In the morning light, the sun starts to rise,
A brand new day, with joy in our eyes.
The laughter of friends, the smiles we share,
Major chords singing, floating in the air.
(Chorus)
Happy, oh so happy, life is full of glee,
Major chords dancing, like leaves on a tree.
With every note we play, a sunshine melody,
Major chords ringing, setting our hearts free.
(Verse 2)
As the sun sets low, shadows start to grow,
A touch of sadness, a feeling we know.
But even in darkness, there’s beauty to find,
Minor chords whispering, a bittersweet kind.
(Chorus)
Gentle, oh so gentle, like a quiet stream,
Minor chords weaving, through a moonlit dream.
In every note we play, a touch of mystery,
Minor chords sighing, in sweet harmony.
Lesson 3:
Lesson objective: By the end of this lesson, you will be able to create a unique musical project using ukulele chords and GarageBand software.
Step 1: Ukulele Chords Recording
1. Choose Chords: Select a sequence of ukulele chords that you like. These can be basic chords like C, G, F, or any others you’re comfortable with.
2. Record the Chords: Using a recording device or a smartphone, record yourself playing the chosen ukulele chords. Make sure the recording is clear and without background noise.
Step 2: Import Recording into GarageBand
4. Transfer to Computer: Transfer the recorded ukulele chord sequence to your computer. You can use a USB cable, email, or any method you prefer.
5. Open GarageBand: Launch the GarageBand application on your computer.
6. Create a New Project: Select “New Project” and choose the option that suits your project. You can choose “Empty Project” for more control.
Step 3: Adding Additional Layers with GarageBand Instruments
7. Import the Ukulele Recording:
– Drag and drop your ukulele recording into GarageBand. It will appear as a track in the timeline.
8. Explore Instruments:
– In GarageBand, go to the “Library” on the right side. Explore different software instruments such as piano, drums, or synths.
9. Add Instruments:
– Create a new track for each instrument you want to add. Drag the instrument loops onto the timeline.
10. Experiment with Sounds:
– Experiment with different instrument sounds to find what complements your ukulele chords. You can try changing the pitch, volume, or tempo.
11. Arrange Your Song:
– Use the timeline to arrange your ukulele chords and additional instrument layers. You can extend or shorten sections as you like.
Step 4: Fine-Tune and Edit
12. Fine-Tune Your Recording:
– Listen to your composition and make adjustments as needed. You can edit individual notes, adjust volume levels, or add effects.
13. Add Effects (Optional):
– GarageBand offers a variety of effects. Experiment with reverb, echo, or other effects to enhance your song.
14. Save Your Project:
– Save your project regularly to ensure you don’t lose your work.
Step 5: Share Your Song
15. Export or Share:
– Once you’re satisfied with your song, export it as an audio file. You can share it with others or keep it for your own enjoyment.
16. Celebrate Your Creation:
– Congratulations! You’ve successfully created a short song with ukulele chords and GarageBand. Share your masterpiece with friends and family!
Collaborative Work Expectations:
1. Equal Participation:
– All members should actively contribute to discussions and decision-making.
– Encourage an environment where everyone feels valued and heard.
2. Effective Communication:
– Maintain open and clear communication within the group.
– Encourage the sharing of ideas and ensure that everyone has a chance to express themselves.
3. Team Decision-Making:
– Decisions regarding chord progressions, instrument choices, and overall composition should be made collaboratively.
– Foster a culture of compromise and consensus-building.
Sharing Responsibilities:
1. Task Delegation:
– Clearly define roles and responsibilities within the group.
– Rotate tasks to ensure everyone has a chance to engage in different aspects of the project.
2. Instrument Selection:
– Collaboratively decide on additional instruments to include in the composition.
– Ensure each member has input into the selection process.
3. Problem-Solving:
– Collaboratively address any challenges that arise during the project.
– Discuss and decide on solutions together to maintain a smooth workflow.
Lesson Objective:
1. To put together the “Count On Me” song as one complete performance.
2. To understand the structure of the song.
Warm up exercises:
Count on me lyrics:
Count on me Ukulele Chords:
Fun play along: